
Printing a Cross Stitch Pattern, or Going Paperless
A badly printed chart makes a project harder than it needs to be. Squares too small to read, pages that do not line up, symbols that turned to mush in greyscale. It is all avoidable, and the decisions take a couple of minutes.
Scale is the decision that matters
Everything else is detail. Get the cell size right and the rest follows.
Aim for cells around 5 to 6 millimetres square on the page. Much smaller and you will be squinting at symbols by the second evening. Much larger and a medium design sprawls across thirty sheets.
That means a chart 200 stitches wide needs about 100 to 120 centimetres of paper width, which on A4 is four or five pages across. That is normal. A large design genuinely is a lot of paper, which is one of the honest arguments for not printing it.
Resist the urge to fit it all on one page. A whole design shrunk onto a single sheet is unreadable and you will end up printing it again properly.
Tiling and overlap
Multi-page charts need to be assembled, and small things make that painless.
- Overlap of a few rows between pages, so you can see where one ends and the next begins.
- Row and column numbers on every page, ideally on all four edges. This is the difference between confidently finding your place and counting from the centre every time.
- A page map, a small thumbnail showing which sheet is which. Invaluable once you have twelve pages.
- Page numbers that mean something, like "row 2, column 3" rather than "page 7".
Colour, symbols or both
Colour blocks with symbols on top is the best option if you have a colour printer. You get the visual sense of the design plus unambiguous identification.
Symbols only prints reliably on any printer, costs nothing in ink, and is genuinely easier to read for designs with many similar shades. Plenty of experienced stitchers prefer it.
Colour only looks lovely and is a trap. Similar shades become indistinguishable under a lamp, and you will be constantly comparing against the key.
If you print in black and white, check the symbols survived. Pale colours can print as very light symbols that vanish. Anything printed from a good chart tool should handle this, but it is worth looking at page one before you print sixteen.
What a good chart PDF includes
Beyond the grid itself:
- A cover page with the finished size, stitch count, colour count and fabric assumptions
- A full thread key, ideally with the stitch count per colour so you know what to buy
- Backstitch drawn as lines along cell edges, not approximated with whole squares
- Distinct marks for French knots and beads, so they are not mistaken for stitches
- Centre markers, so you can start in the middle
- The designer's name and copyright notice, so the chart says whose work it is
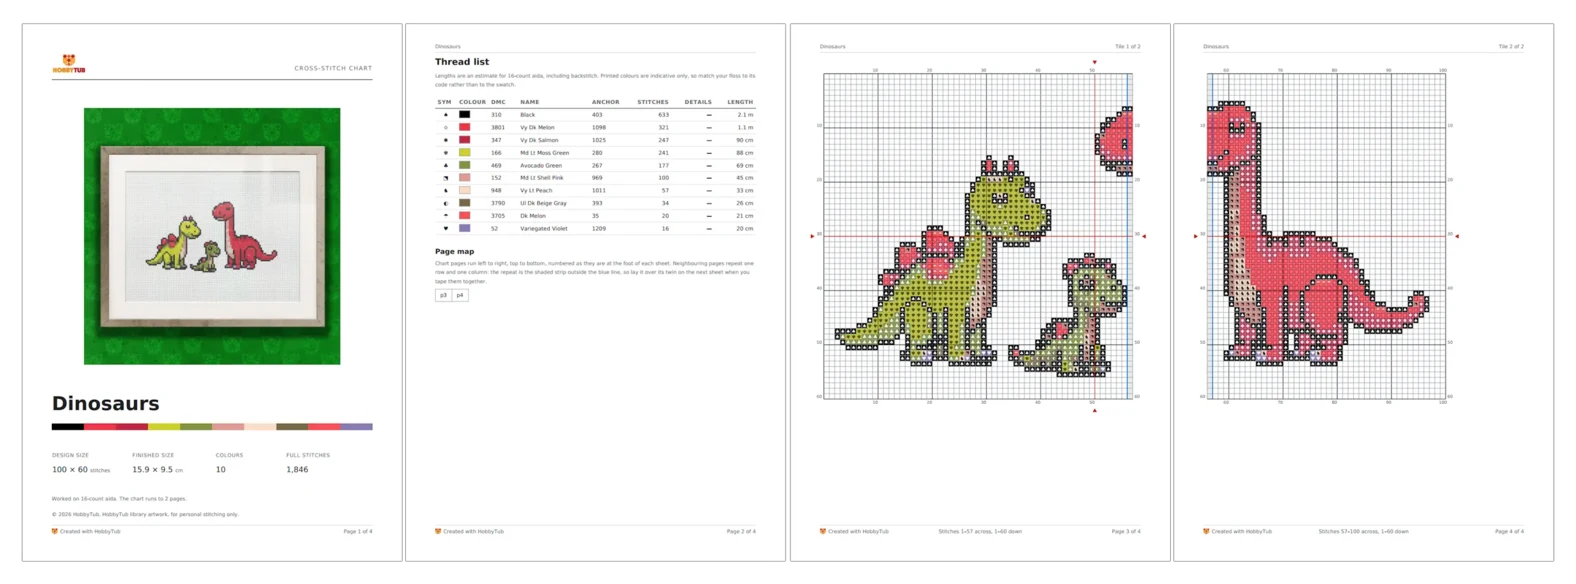
That backstitch point is worth dwelling on, because it is where cheap chart exports fall down. Backstitch that runs along the edges of cells is describing something the stitches cannot, and a chart that flattens it into coloured squares has lost information you need. Our pattern converter exports a PDF built this way, with knots as circles and beads as ellipses in their thread colours. If you designed the chart, its cover carries your own name, logo and copyright notice, and a chart imported from someone else's file keeps theirs. If you design charts to sell, how to sell cross stitch patterns covers what else buyers expect.
Practical printing tips
- Print at 100 percent, with any "fit to page" or "shrink oversized" option turned off. Scaling silently changes your cell size.
- Print one page first and check it before committing to the whole thing.
- Use a heavier paper if you will be handling it for months. Ordinary copier paper gets tatty.
- Punch and file it, or put pages in sleeves. Loose sheets get out of order.
- Print the key twice, and keep one copy with your threads.
When not to print at all
For a large design, printing is a lot of paper and a lot of ink, and paper has real disadvantages. It cannot zoom, it cannot isolate a colour, and marking your progress on it is permanent.
Working from a screen solves those. Zoom in when the symbols get dense, filter to the colour you are working, and mark stitches off as you go so you always know exactly where you were. Nothing to reprint when you change your mind, and nothing to lose. There is more on the marking-off side in markup apps, trackers and keeping your place.
The obvious objections have mostly gone away. A tablet propped next to the work is no more awkward than a chart on a stand, screens are readable, and a modern tool keeps working when the connection does not.
A reasonable middle ground
Plenty of people do both, and it is a sensible answer. Work from the screen for the marking off and the zooming, and keep one printed page for the thread key, since that is the thing you glance at constantly and least want to scroll for.
Whichever you choose, decide before you start rather than a third of the way in.
You can export a printable chart from HobbyTub, or track a project on screen and skip the printer entirely.